Introduction
The PLP Scenario Manager is used to create, run and manage PLP optimization scenarios. Scenarios can be used to simulate different inputs in order to explore the impact on empty flow by changing different inputs in the scenarios. This facilitation can create multiple scenarios that needs to be managed carefully in order to determine which scenario should be selected as the valid plan, i.e. the "basecase".
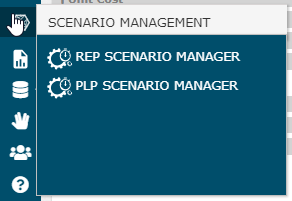
Page Access
The page is accessible from the sidebar using the "PLP" entry point. For specific permissions in the site, see User Roles & Permissions.
Overview
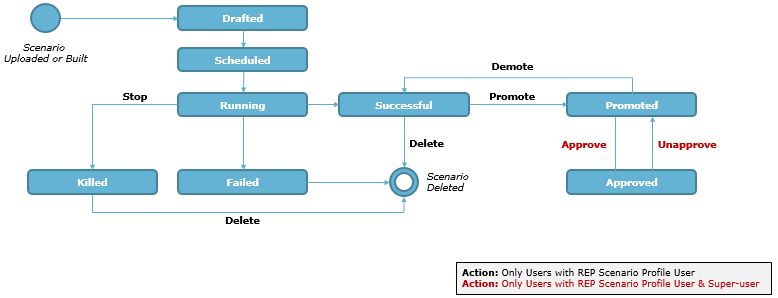
Scenario Life-cycle
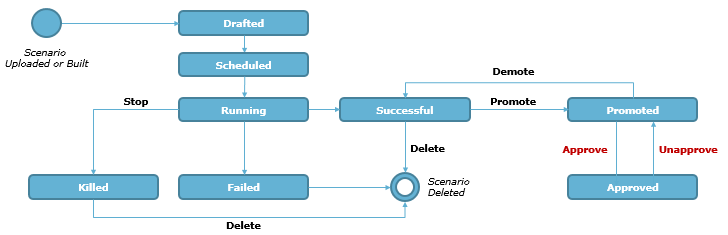
When a scenario is uploaded or built it automatically gets sent to ROCK. First the scenario transitions through states "Drafted" and "Scheduled" before being picked up by the software and is "Running". If a user would manually stop the scenario while it is running, the scenarios is "Killed" and can only be deleted. When scenario completes in state "Failed", user can review the results and decide to delete the scenario completely. If scenario completed in state "Successful" the scenario can transition further to state "Promoted", representing the scenarios that ROCK should consider for reporting purposes. Of all scenarios in state "Promoted", only one scenario can be further put in state "Approved", representing the current basecase. Scenarios can be "Unapproved", and "Demoted" to transition back to "Successful" state and finally, if decided, be deleted.
Basecases and Candidates
Moving scenarios between states Succesful to Promoted and Approved is used to process and mature the relevant basecases. As scenarios are moved to promoted, it means it is a basecase candidate. When scenarios are moves to Approved State, it means they are the valid basecase. For PLP only one basecase is allowed per day.
To facilitate equipment planning in accordance with PLP, when promoting new basecases PLP output is translated as modifications, creation of new, or cancellation of existing OTTs
Scenario Manager Screen Sections
The Scenario Manager consists of three sections that collectively contains all scenarios. Depending on the state of each scenario, it will be populated in one of the three sections. The below illustration shows states associated to each section.
| Basecase Management | Completed Scenarios |
|
|
| Running Scenarios | |
|
Scenario Management
The PLP Scenario Manager screen is used to transition scenarios between the states (see state-chart diagram in Optimisation and Scenarios).
New Scenarios
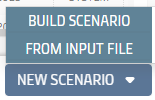
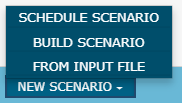
Users can specify new optimization problems by building new scenarios in in the Scenario Manager. This can be done through any of the below options from the "New scenario" drop-down menu in the bottom-pane of the scenario manager screen.
The options available are described in the below table
| Option | Description | |
|---|---|---|
| 1 | Build scenario | This option allows initiates a dedicated assistant to build a new scenario from scratch by selecting specific versions of reference data in the ROCK master data. This allows user to manage scenario creating from end-to-end, by first making sure the required master data references are updated and available in the ROCK Master Data, before creating the scenario and sending it to the optimizer. When all inputs are specified in the forms and the user submits, then the scenario is used to generate an optimization problem that is run in the PLP solver. |
| 2 | Schedule scenario | The option initiates a dedicated assistant, similar to "Build Scenario" assistant, but includes additional settings to specify how scenarios should run automatically.
|
| 3 | From input file | This option allows users to upload an input file as an excel. This is particularly useful if a user wants to make simulate the impact of a change to an existing scenario, by downloading the input file and making appropriate modifications (e.g. changing target stock levels or limiting services). |
Build New Scenario
The assistant requires three sections to be filled out, "Basic details", "Parameters" and "Reference Data".
Section: Basic details
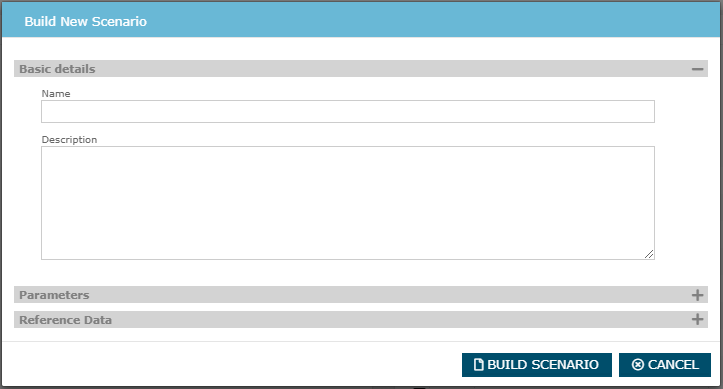
The Name field is mandatory and must be filled out by the user. The Description field is optional and can be used to specify relevant details for the optimization problem being specified (e.g. is it the next basecase, or a simulation to compare different flow options against each other).
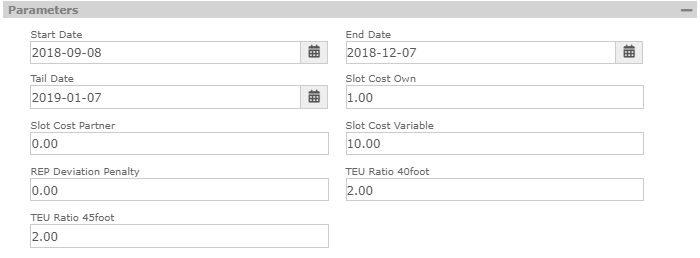
Section: Parameters
This section allows users to specify the parameters for the scenario, which are used to set the dates for the planning horizon, compliance date, and values for some global entities.
Explanation for usage and relevant examples are described in PLP Optimiser section.
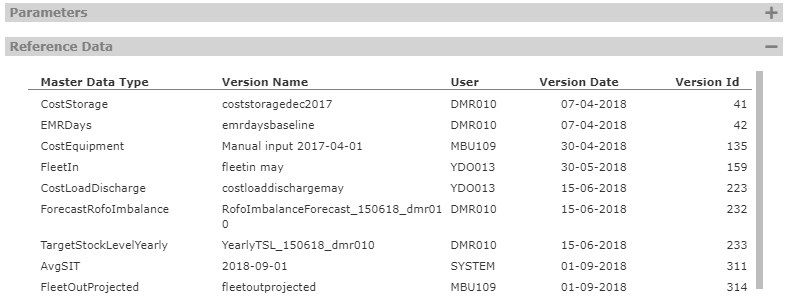
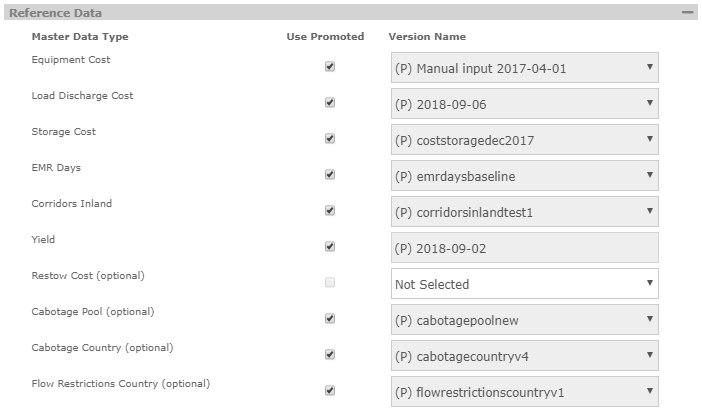
Section: Reference Data
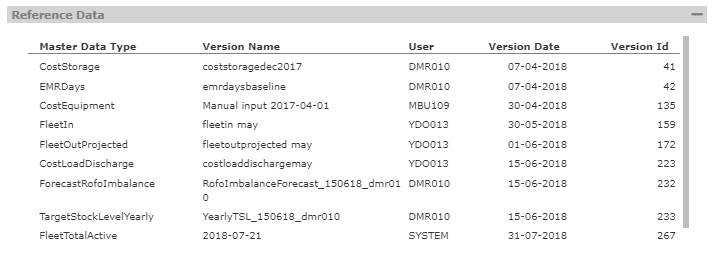
The Reference Data section is used to specify specific data to be used in the scenario being built.
The assistant shows one row for each relevant Master Data Type to be selected. Not all Master Data Types required for building the scenario is shown, as some reference data is fixed for all scenarios and irrelevant (e.g. geo data).
To each Master Data Type, the available data references from ROCK Master Data is shown under the column "Version Name" as a drop-down list. To quickly identify the promoted version of the data, a prefix "(P)" is indicated in the name. Furthermore, in addition to the warning icons shown in Master Data, when Master Data types require a promoted version at any time, but does not have one, a warning icon is shown. This indicates a non-optimal state, that should be solved by CEN EQU.
To assist users in selecting optimal versions of data, the column "Use Promoted" allows users to quickly select the promoted version from the drop-down list. This is helpful when manually generating the latest basecase, as all the Promoted versions indicate the latest and most relevant data. For some Master Data Types, adding the data to the scenario is optional. This is indicated by the suffix "(optional)" on the name of the specific Master Data Type.

Schedule Scenario
The schedule scenario assistant includes the same sections as the "Build Scenario" assistant; "Basic details", "Parameters" and "Reference data". The main difference is the way the settings in the "Reference Data" section is used, the settings to automate the scenarios and finally the notifications thrown to relevant users.
Automatically Use Promoted
When specifying the Reference Data to be used for the scenario, the user must specify either the "UsePromoted" setting or a specific "Version Name".
Contrary to the "Build Selection", when UsePromoted is selected, this setting is saved as part of the configuration for all scheduled PLP scenarios. In "Build Scenario", the current Promoted version is selected, but in "Schedule Scenario", every time the PLP runs automatically, the version that is currently Promoted at the time a scenario is being prepared, is selected and used.
| Build Scenario | Schedule Scenario | |
|---|---|---|
Interpretation of "Use Promoted" Setting | Selects the Reference Data that is currently promoted. | Selects the Reference Data that is promoted at the time the scheduled scenario is being prepared. |
Failed Scheduled Scenarios
To ensure that new PLP scenarios are released every day, a mechanism is required to notify relevant stakeholders when scheduled PLP scenarios does not complete successfully. To facilitate this process, notifications are thrown to relevant CEN FLOW users, to manually react and make required changes to release a new version of PLP.
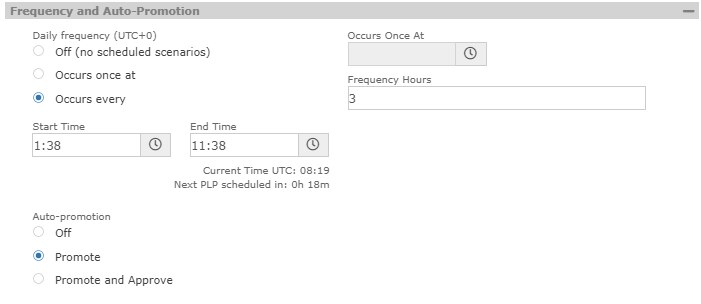
Section: Frequency and Auto-Promotion
The "Frequency and Auto-Promotion" section allows users to specify Daily frequency that PLP schedules should be released, and Auto-promotion of the scenario (the proper end-state of the scenario)
| Daily frequency | The daily frequency has three settings
|
| Auto-promotion | The auto-promotion setting specifies the end-state of scheduled scenario that complete successfully.
|
Delete Scenario
The "Completed scenarios" section allows users to select scenarios using check boxes and delete the scenarios using the associated "Delete" button.

Promote and Approve Scenario
Depending on the state of the scenario it is possible to "Promote", "Demote", "Approve", "Unapprove" using buttons in the Scenario Dialog. Only relevant buttons to do allowed state transitions are shown (e.g. scenarios in state "Approved" can only be Unapproved).
When scenarios are promoted using the "Promote" transition button to state "Promoted", the scenario results are imported in ROCK in terms of cancellation, creation and modification of existing OTTs.
Scenario Data
Scenario Input and Output
In each of the sections in the PLP Scenario Manager screen, the scenarios are presented as rows, with relevant information shown in the columns. The starting day ("basecase day") is signified in the grid. Furthermore, each scenario is extended with quick links to download the associated input data to an excel "Input file", and if the scenario is completed successfully, it is also possible to download the result as an excel "Output file". The output filed contains the "raw" data output, produced by PLP.

PLP Results File
It is possible to analyse the output of scenario reports through a macro-enabled excel template, specifically prepared for this purpose. Based on the same data available from the output file, the following views/sheets are included in the file, to analyze the PLP result.
| Sheet | Description | |
|---|---|---|
| 1 | Field descriptions | Description of the fields used in each of the reports/sheets included in the PLP Results File |
| 2 | Setup | Using this sheet, parameters can be set up to select a specific scenario for analysis, and trigger data connections to be updated in the file. |
| 3 | StockProjection | This chart presents the stock projection for specific geos and equipment types, by adhering to the changes proposed by the scenario output. The stock projection can be compared against the Target Stock Levels, similar to Stock Performance Graph in ROCK, but future-looking. |
| 4 | Flows | This chart presents each flow that is part of the solution, in terms of specific OTTs with associated information about the sailing. The OTTstatus column indicates the change proposed by the solver. This can either to "Replan" or to "Update" the OTT. If no changes are proposed, the status will be "Unchanged". |
| 5 | CorridorFlows | This chart presents the optimised flow on inland corridors (Rail/Truck/Barge modality). The logic used to generate the inland flows for PLP is documented in section Inland OTTs. |
| 6 | VesselCallUtilisation | This chart presents the expected capacity in terms of TEU and MT for each future sailing, available for empty containers. Furthermore, the overview specifies volume for every call in terms of volume already on board the ship and what is planned to be loaded and discharged. |
| 7 | REPCompliance | This chart presents the projected stock per week, based on PLP, in comparison with the stock proposed by REP. Going above of below the REP stock target is allowed, but a penalty is introduced by the model to caution that behavior. |
| 8 | StockProjectionTEU | This chart presents the projected stock to each pool in TEU, across all equipment types in comparison wit the local storage limits. It is allowed to exceed the storage limits, but a penalty is introduced by the model to caution that behavior. |
| 9 | StockProjectionPenalty | This chart presents a the calculated penalty of the suggested solution in terms of three criteria:
|
Integrating the workbook as reporting functionality directly in ROCK is being considered as part of future developments.
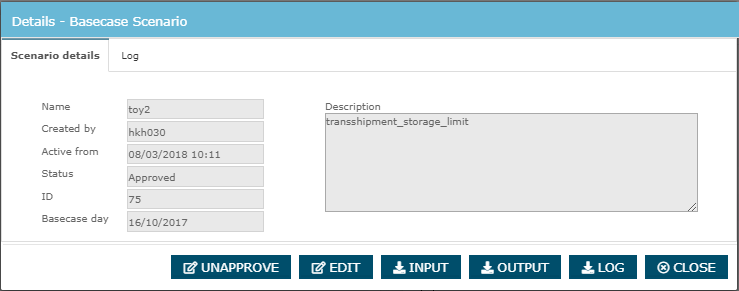
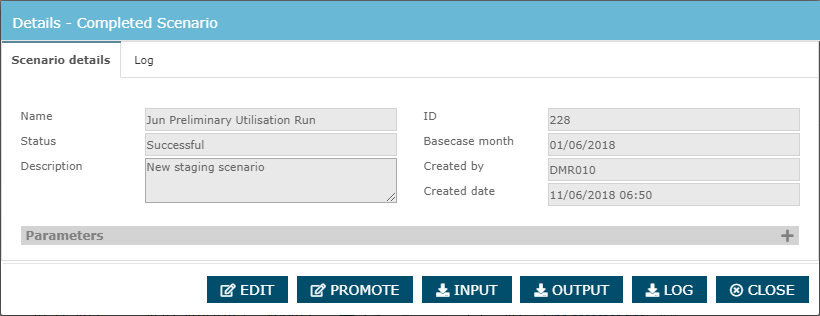
Scenario Dialog
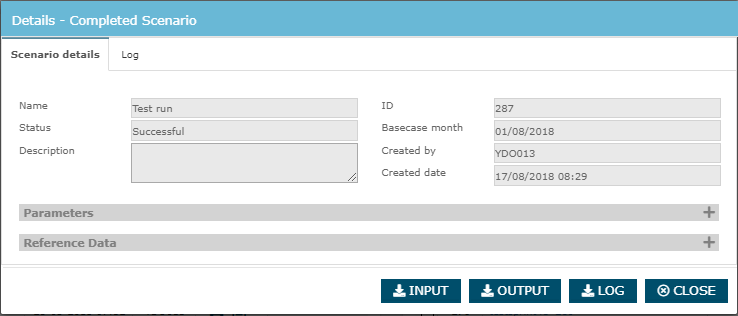
To each scenario it is possible to click the "Name" column to open a dialog with additional information. When scenario details have been opened, a set of tabs, or nav's are shown in the top of the popup. The dialog also includes buttons to download the input file, the output file, a copy of the logged events during the optimization, and a button close the dialog. Furthermore, an "Edit" button allows user to change the name and description of the scenario.
Scenario Details
The scenario details tab is the default tab when scenario is opened. It allows user to inspect the metadata associated to the scenario. If the scenario has been created using the "Build Scenario" wizard or if it is an automated scheduled build, references to the master data and parameters used can be explored in an accordion element. This allows further analysis and comparison of scenarios to each other. If scenario is created by directly uploading an input file, the references are lost and cannot be explored in the "Scenario Details" tab. The parameter section is available for for all scenarios, irrespectable of how they were created.
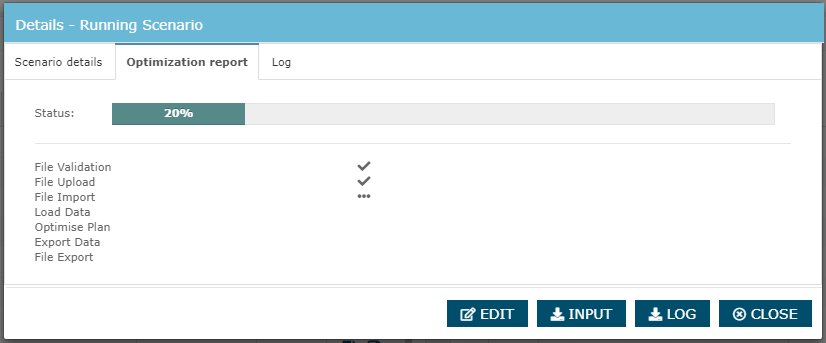
Optimization report
The "Optimization report" tab is only visible for running scenarios. It shows the steps included as part of running the scenario in the optimizer. When scenario completes to state "Successful" of "Failed", the tab becomes unavailable.
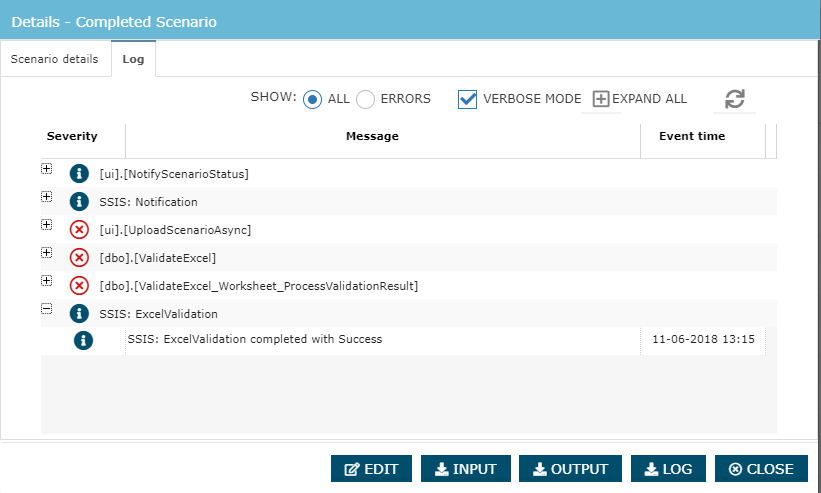
Log
The "Log" tab is an event log of the optimization run, enabling details analysis of what happened during optimization. It is especially useful for analyzing reason behind failed scenarios with errors.
The log includes filtering options to show all events, i.e. information events, warning events and error events, or to filter on error events specifically. The verbose mode can be enabled and disabled to include all logged events, verbose events include events that are highly detailed and only relevant for conducting detailed analysis.
The parameter section is available for “build” / “schedule” scenarios and also “upload”.